上篇文章我们部署测试了下Argocd,不过Argocd是基于Git声明式管理,需要将Deployment,Service 等YAML都放到git中,研发自助上线时需要修改YAML,上线时会覆盖到生产环境,如若生产环境对应用的的资源分配或副本等做过调整将会被覆盖,而且也有修改错误的风险。
这次调研测试Jenkins主要是想通过Jenkins 让研发自助上线时仅需关注Image版本,无法修改其他内容,这样就避免了很多风险
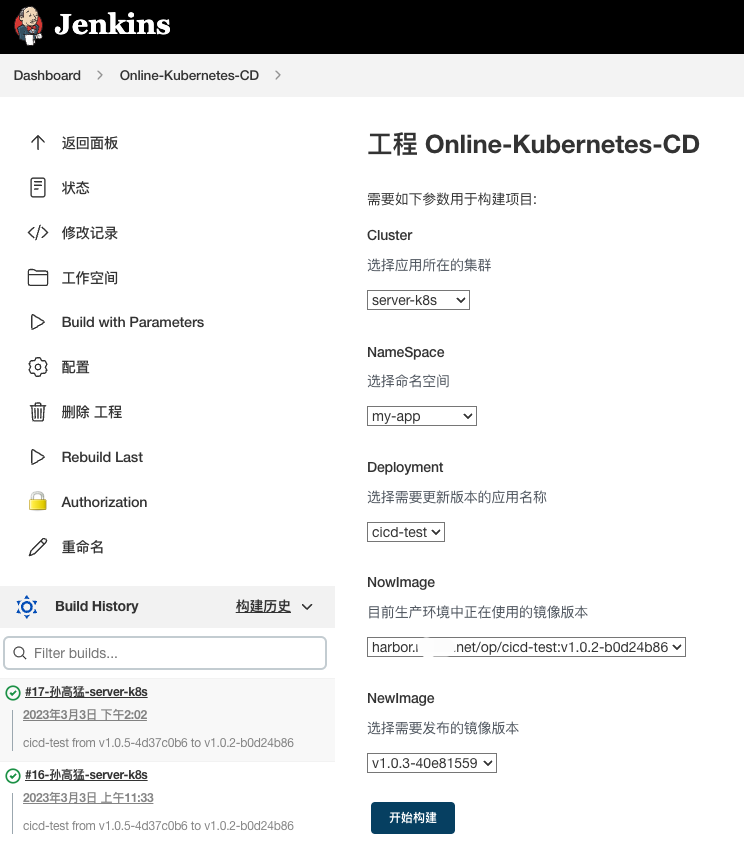
控制台效果
流程介绍
如上图,项目界面点击Build with Parameters后会展示出可选择界面
主要有以下功能
- 当有多集群时,可选择需发布应用所属的集群(将多集群应用统一一个jenkins上线控制台)
- 选择对应集群中的命名空间
- 选择对应命名空间中需发布的应用
- 展示出需发布应用当前正在使用的镜像版本
- 选择需要发布的镜像版本
以上单选框的值均是逐层依赖关系,采用的参数化构建的Active Choices Reactive Parameter功能
环境信息
Kubernetes: 阿里云ACK 托管集群
因k8s集群在阿里云,Jenkins在公司内网,所以需要为k8s apiserver 绑定公网访问入口
- 点击”集群信息”->”基本信息”,”API Server 公网连接端点”处点击”绑定公网IP”按钮,创建弹性IP后将会绑定到APIserver 的SLB上
- 绑定后需为APIserver 的SLB添加IP白名单限制,仅允许以下网段访问(防止被攻击)
- 放通VPC网段,pod网段,节点网段,Service网段和100.64.0.0/10地址(这样保证阿里云内部访问正常)
- 放通Jenkins出口网段(这样Jenkins可以通过kubelet命令调用集群数据)
镜像仓库 (我这里用到两个)
- 自建Harbor
- 阿里云容器镜像服务个人版
- 需在Jenkins服务器安装aliyun cli命令行工具
- (用于获取镜像tags列表)
- 个人版和企业版命令行不一样,具体可更改下面是k8s.sh脚本内容
- 需在Jenkins服务器安装aliyun cli命令行工具
Jenkins 需安装以下插件
- Active Choices Plug-in版本2.6.4 #参数关联
- build user vars版本1.8 #定义名称全局变量
- Build Name and Description Setter版本2.2.0 #用户生成自定义Build Name
- description setter plugin版本1.10 #用户生成自定义Build Description
Jenkins 服务器脚本准备
将各集群访问Apiserver的KubeConfig存放到
/opt/kubeconf/目录下,文件名写为集群名称,下面参数化构建和k8s.sh脚本需要调用需要在服务器创建一个脚本
/opt/kubeconf/k8s.sh脚本内容如下,
Harbor和Aliyun Cli部分账户密码需要修改为自己的action=$1
cluster=$2
namespace=$3
deploy=$4
case $action in
GetNs)
# Get NS List
kubectl --kubeconfig /opt/kubeconf/$cluster get ns |awk '{print $1}'|egrep -v "NAME|kube-|arms-"| tr "\n" ","
;;
GetDeploy)
# Get Deploy List
kubectl --kubeconfig /opt/kubeconf/$cluster -n $namespace get deploy |awk '{print $1}'|egrep -v "NAME" | tr "\n" ","
;;
GetNowImage)
# Get Deploy Image
kubectl --kubeconfig /opt/kubeconf/$cluster -n $namespace get deploy $deploy -o jsonpath="{.spec.template.spec.containers[*].image}" | tr "\n" ","
;;
GetRepoTagsList)
#Get Repositories Image lists
NowImage=$2
RepoAddress=$(echo $NowImage |awk -F '/' '{print $1}')
RepoName=$(echo $NowImage | awk -F'/|:' '{print $2"/"$3}')
if [[ $RepoAddress == 'harbor.roobo.net' ]]
then
curl -s -u "需填写用户名:密码" -X GET -H "Content-Type: application/json" "https://需填写Harobor域名/api/repositories/${RepoName}/tags" | | jq .[].name | tr "\n" "," |sed 's/"//g'
elif [[ $RepoAddress =~ aliyuncs.com ]]
then
/usr/local/bin/aliyun cr --force --version 2016-06-07 --region cn-beijing --access-key-id 须填写accesskeyid --access-key-secret 须填写accesskeysecret GET /repos/${RepoName}/tags |jq .data.tags[].tag | tr "\n" "," |sed 's/"//g'
fi
;;
SetImage)
# Update Deployment Image
NowImage=$5
NewImage=$6
RepoAddress=$(echo $NowImage | awk -F':' '{print $1}')
OldImageVersion=$(echo $NowImage | awk -F':' '{print $2}')
kubectl --kubeconfig /opt/kubeconf/$cluster -n $namespace set image deploy $deploy $deploy=$RepoAddress:$NewImage
while :
do
Status=$(kubectl --kubeconfig /opt/kubeconf/$cluster -n $namespace rollout status deploy $deploy --watch=false)
if [[ $Status =~ "successfully" ]]
then
echo "==== Successful Deployment ===="
echo "Deployment details: $deploy from $OldImageVersion to $NewImage"
echo "OldImage=$NowImage"
echo "NewImage=$RepoAddress:$NewImage"
break
else
echo "$Status"
sleep 5
fi
done
;;
esac
Jenkins项目创建
实现Build with Parameters
分步骤实现,注意以下参数过程中
名称列需固化,每层参数构建都有变量依赖
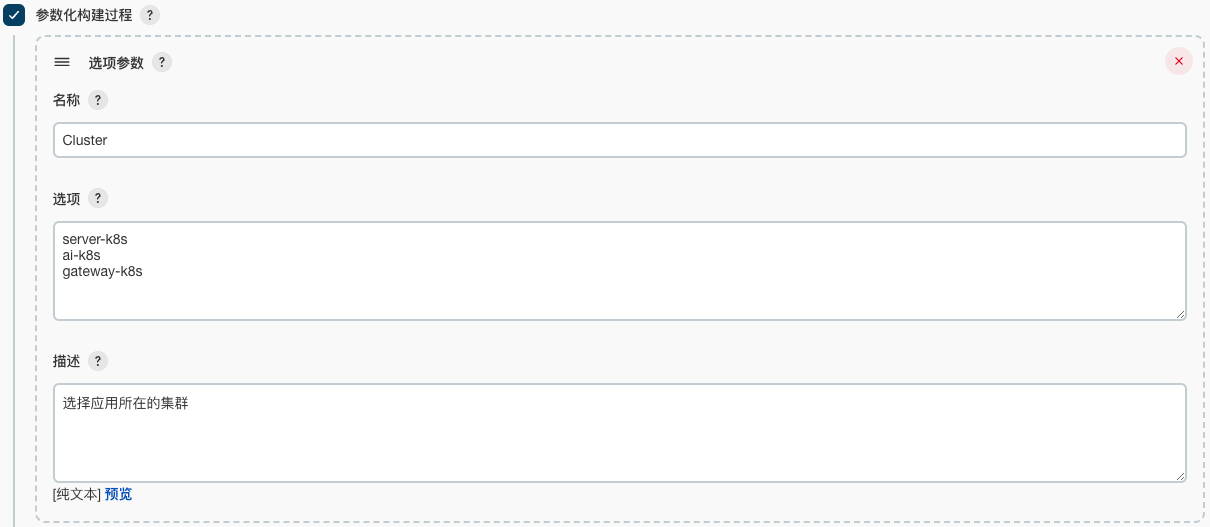
1. 集群列表
在参数化构建过程中添加选项参数
名称列填写Cluster选项列填写各个kubernetes集群名称(需与/opt/kubeconf/目录下KubeConfig集群名称一致)
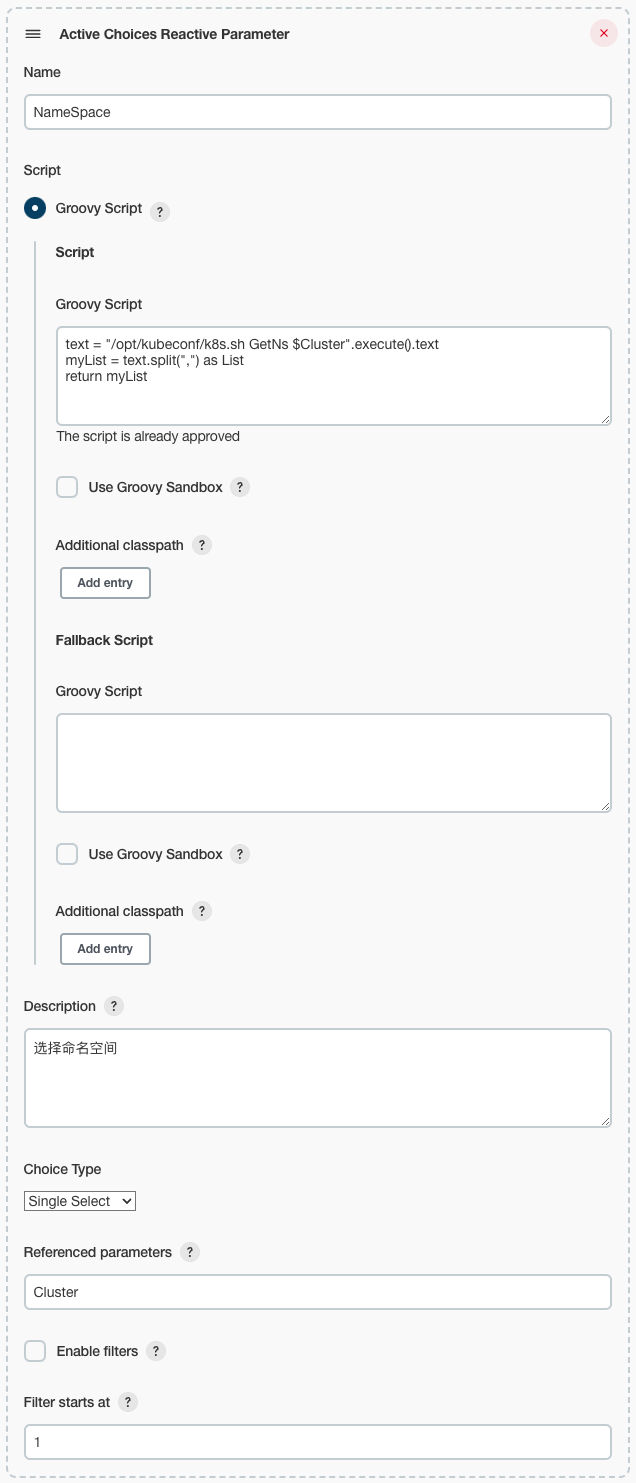
2. 命名空间
在参数化构建过程中添加Active Choices Reactive Parameter
Name列填写NameSpace- 选择
Groovy Script脚本text = "/opt/kubeconf/k8s.sh GetNs $Cluster".execute().text
myList = text.split(",") as List
return myList Choice Type选择Single Select即单选项Referenced parameters填写Cluster(获取Namespace时需要依赖$Cluster)
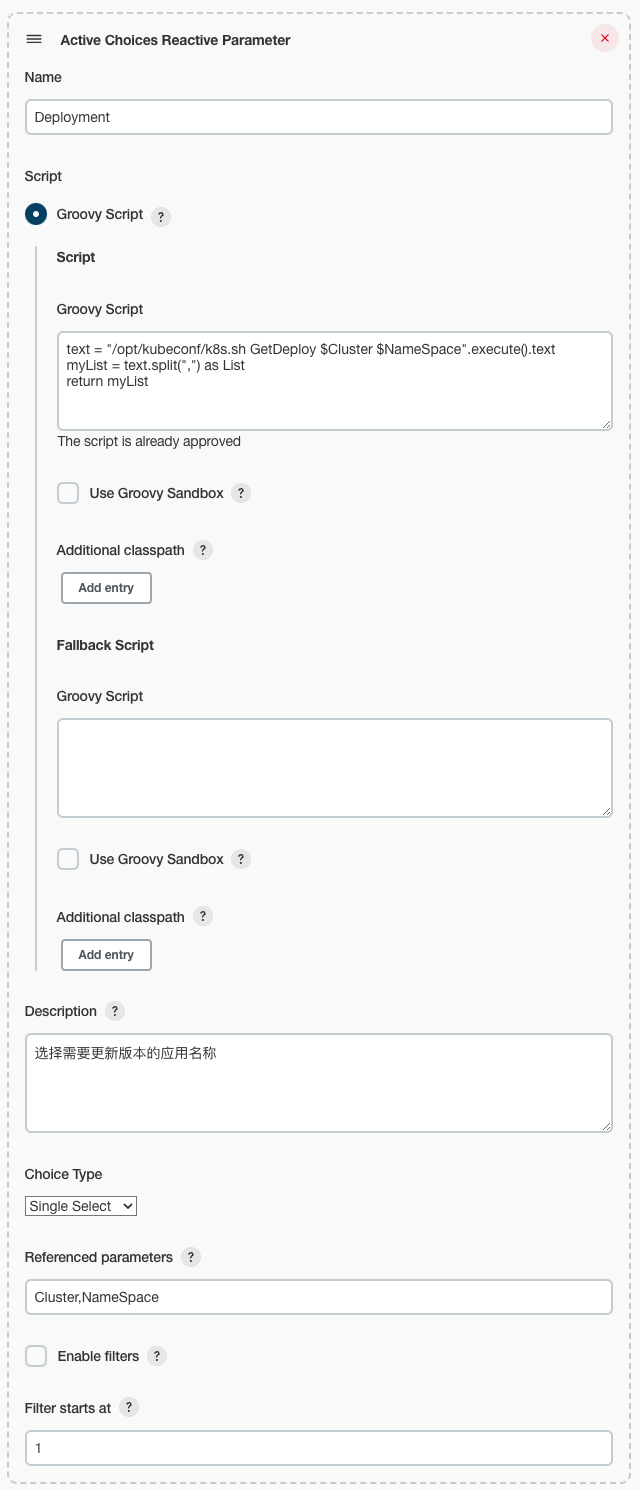
3. 应用
在参数化构建过程中添加Active Choices Reactive Parameter
Name列填写Deployment- 选择
Groovy Script脚本text = "/opt/kubeconf/k8s.sh GetDeploy $Cluster $NameSpace".execute().text
myList = text.split(",") as List
return myList Choice Type选择Single Select即单选项Referenced parameters填写Cluster,NameSpace(获取Deployment时时需要依赖$Cluster,$Namespace)
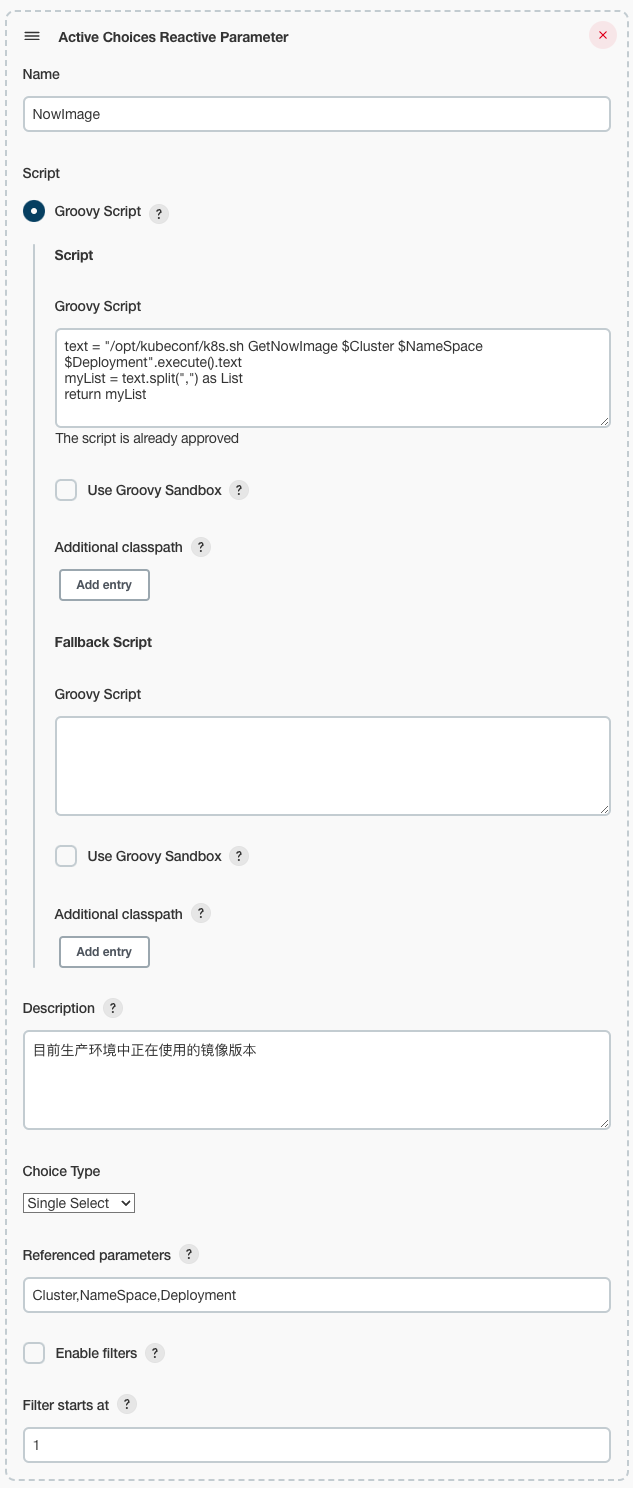
4. 当前镜像
在参数化构建过程中添加Active Choices Reactive Parameter
Name列填写NowImage- 选择
Groovy Script脚本text = "/opt/kubeconf/k8s.sh GetNowImage $Cluster $NameSpace $Deployment".execute().text
myList = text.split(",") as List
return myList Choice Type选择Single Select即单选项Referenced parameters填写Cluster,NameSpace,Deployment(获取NowImage时时需要依赖$Cluster,$Namespace,$Deployment)
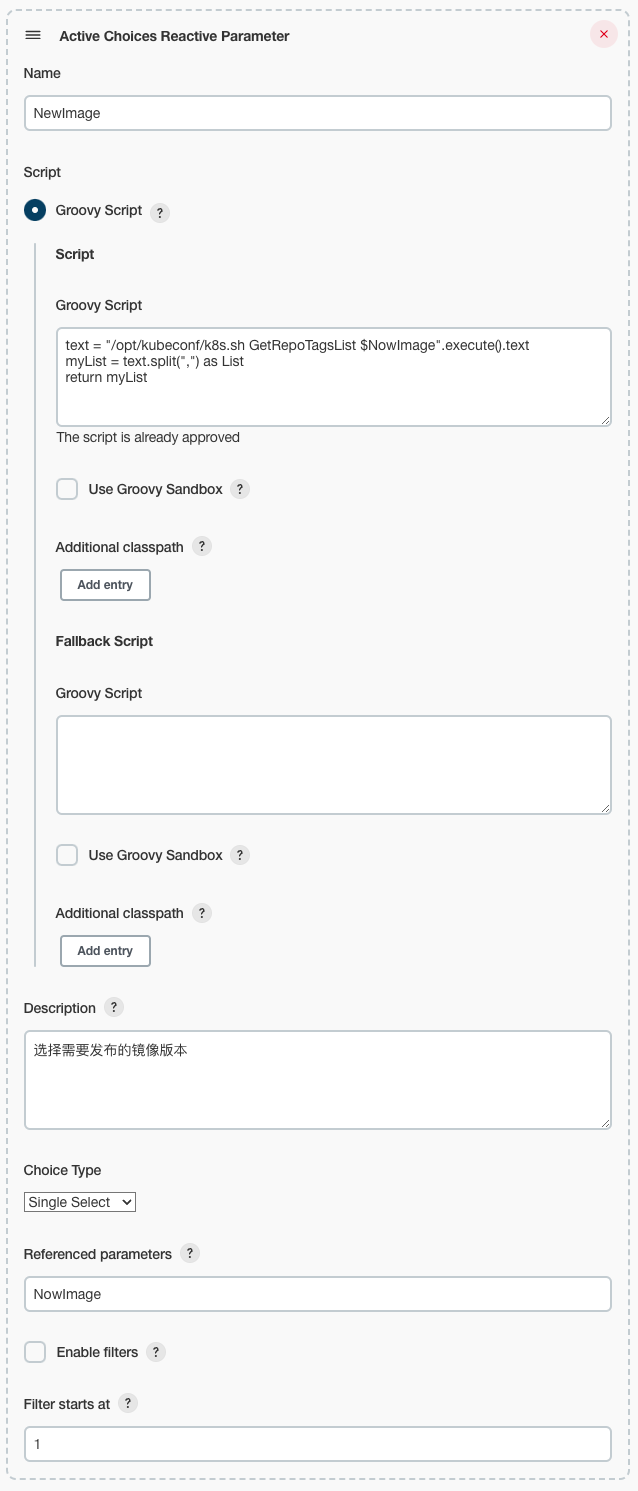
5. 选择新镜像
在参数化构建过程中添加Active Choices Reactive Parameter
Name列填写NewImage- 选择
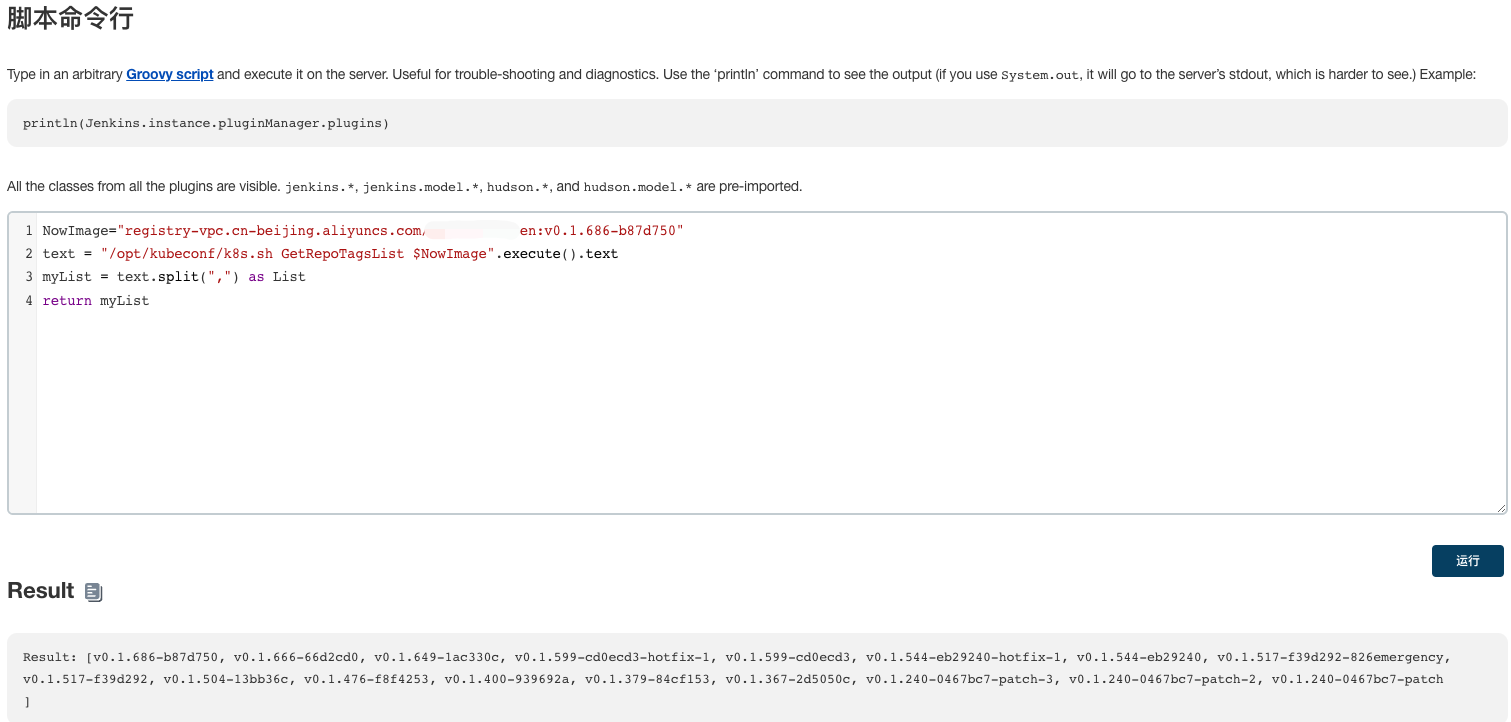
Groovy Script脚本text = "/opt/kubeconf/k8s.sh GetRepoTagsList $NowImage".execute().text
myList = text.split(",") as List
return myList Choice Type选择Single Select即单选项Referenced parameters填写NowImage(获取NewImage时需要依赖$NowImage, 根据NowImage去对应镜像仓库里查询所有的tags)
实现构建过程
添加 执行 Shell
在增加构建步骤中选择执行shell
脚本内容为:
/opt/kubeconf/k8s.sh SetImage $Cluster $NameSpace $Deployment $NowImage $NewImage |
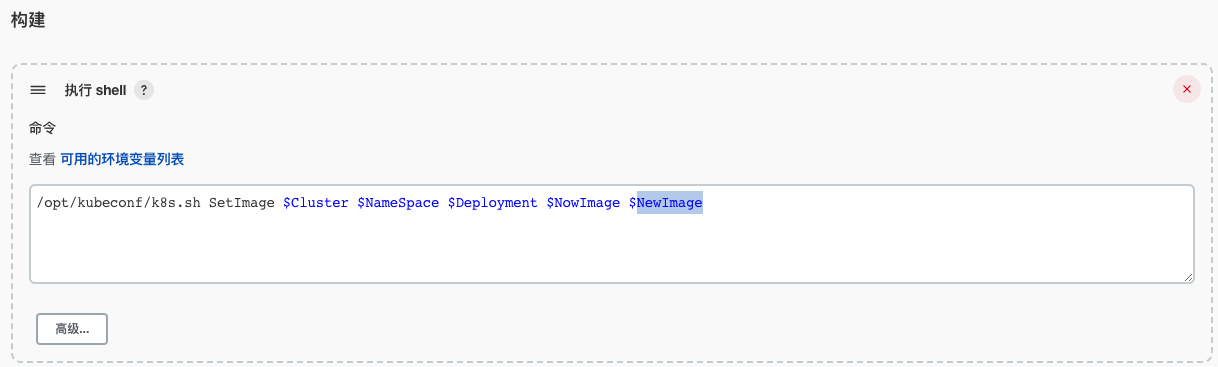
此时在Dashboard界面即可选择对应Deployment 和 新的镜像进行构建了。
Build History 展示内容优化
默认的展示内容仅显示次数和时间,不显示任何版本相关信息,在查看构建历史时非常不明朗
设置构建名称
- 在
构建环境中勾选Set Build Name,并将Build Name设置为#${BUILD_NUMBER}-${BUILD_USER}-${Cluster}
- 在
构建环境中勾选Set jenkins user build variables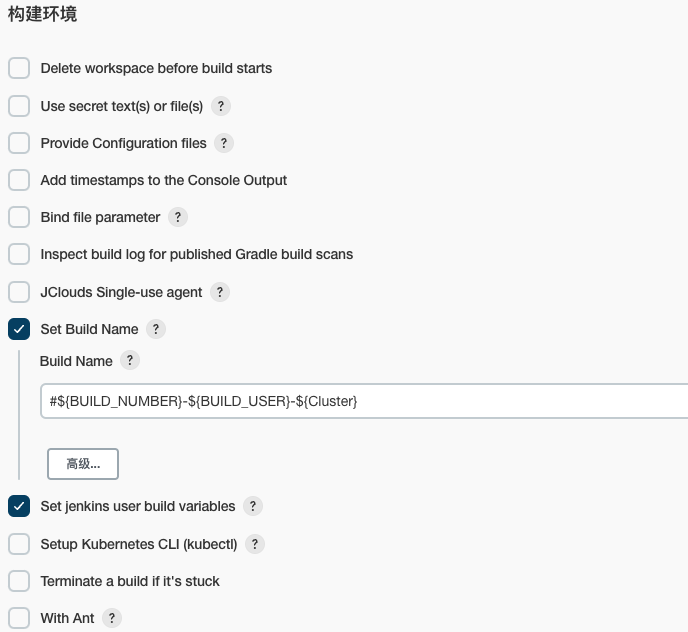
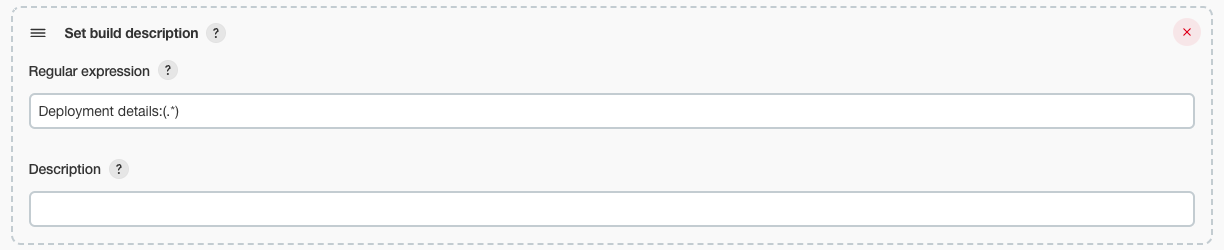
设置构建描述
在增加构建步骤中选择Set build description,Regular expression内容填写为
Deployment details:(.*) |
在构建脚本/opt/kubeconf/k8s.sh执行结束后脚本会输出以下log,此正则将会匹配内容并设置到构建描述信息中
Deployment details: cicd-test from v1.0.5-4d37c0b6 to v1.0.2-b0d24b86 |
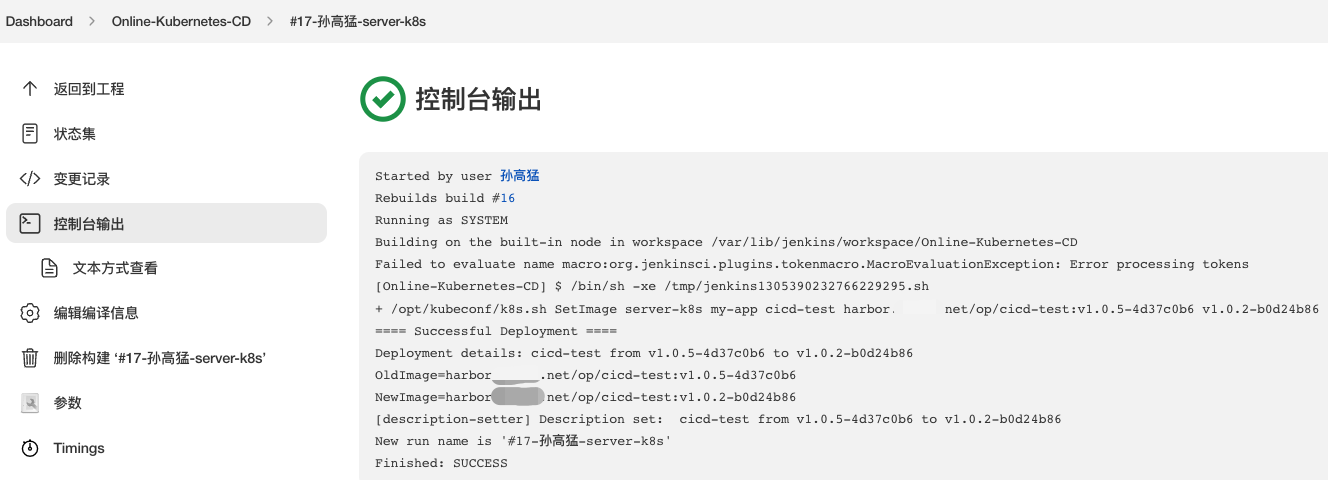
控制台输出Log
构建钉钉/邮件通知和Groovy脚本调试
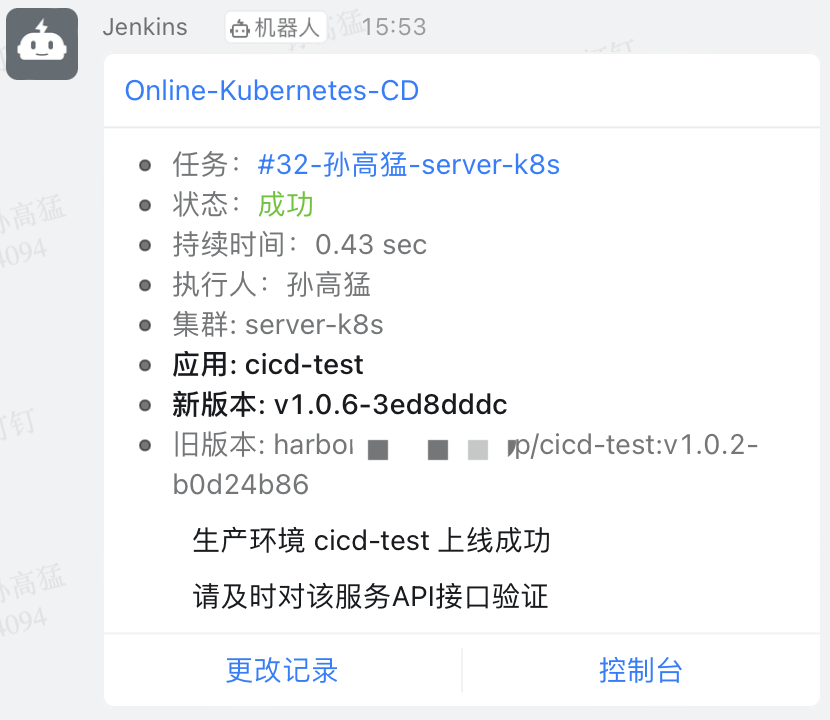
构建钉钉通知
- jenkins 安装插件 DingTalk
- 参考官方文档添加钉钉机器人并配置到Jenkins全局设置中
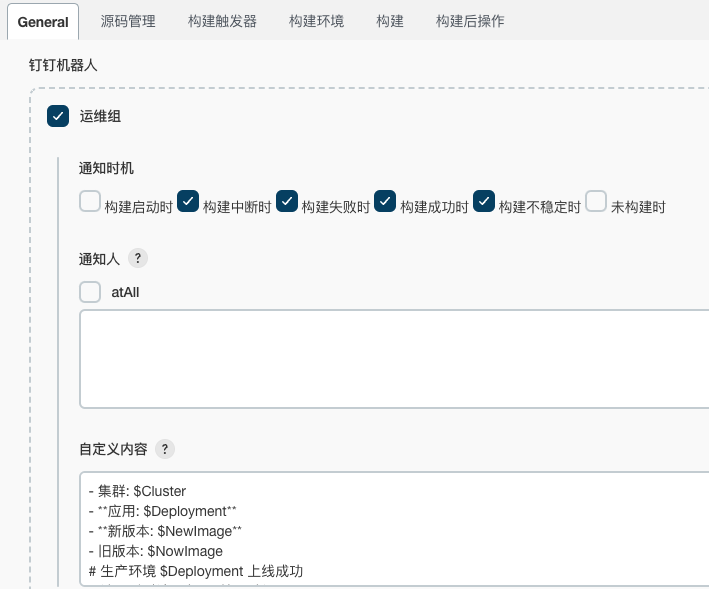
- 项目配置界面勾选
钉钉机器人通知并设置自定义内容- 集群: $Cluster
- **应用: $Deployment**
- **新版本: $NewImage**
- 旧版本: $NowImage
# 生产环境 $Deployment 上线成功
# 请及时对该服务API接口验证
配置界面
效果展示
邮件通知
安装插件
- Email Extension版本2.66
- 安装后参考网上文档进行邮件服务器和账户的配置
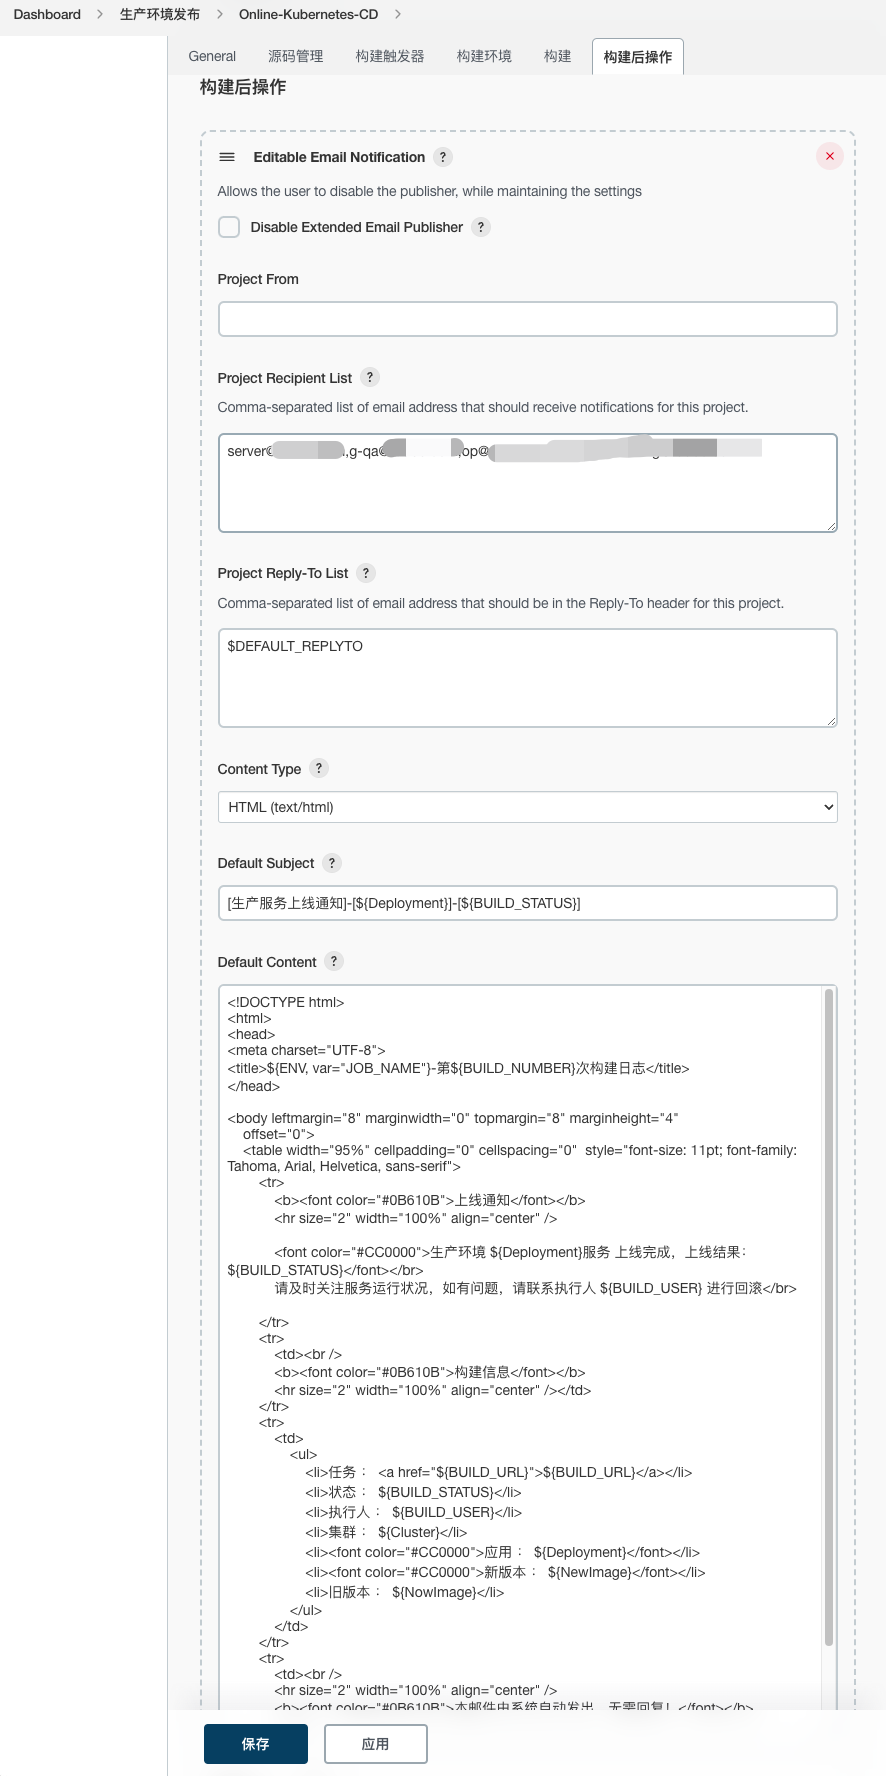
项目配置
设置收件人
在Project Recipient List处指定收件人邮件,多个账户以逗号分隔
设置邮件内容格式
在Content Type处设置为HTML(text/html)
设置邮件内容
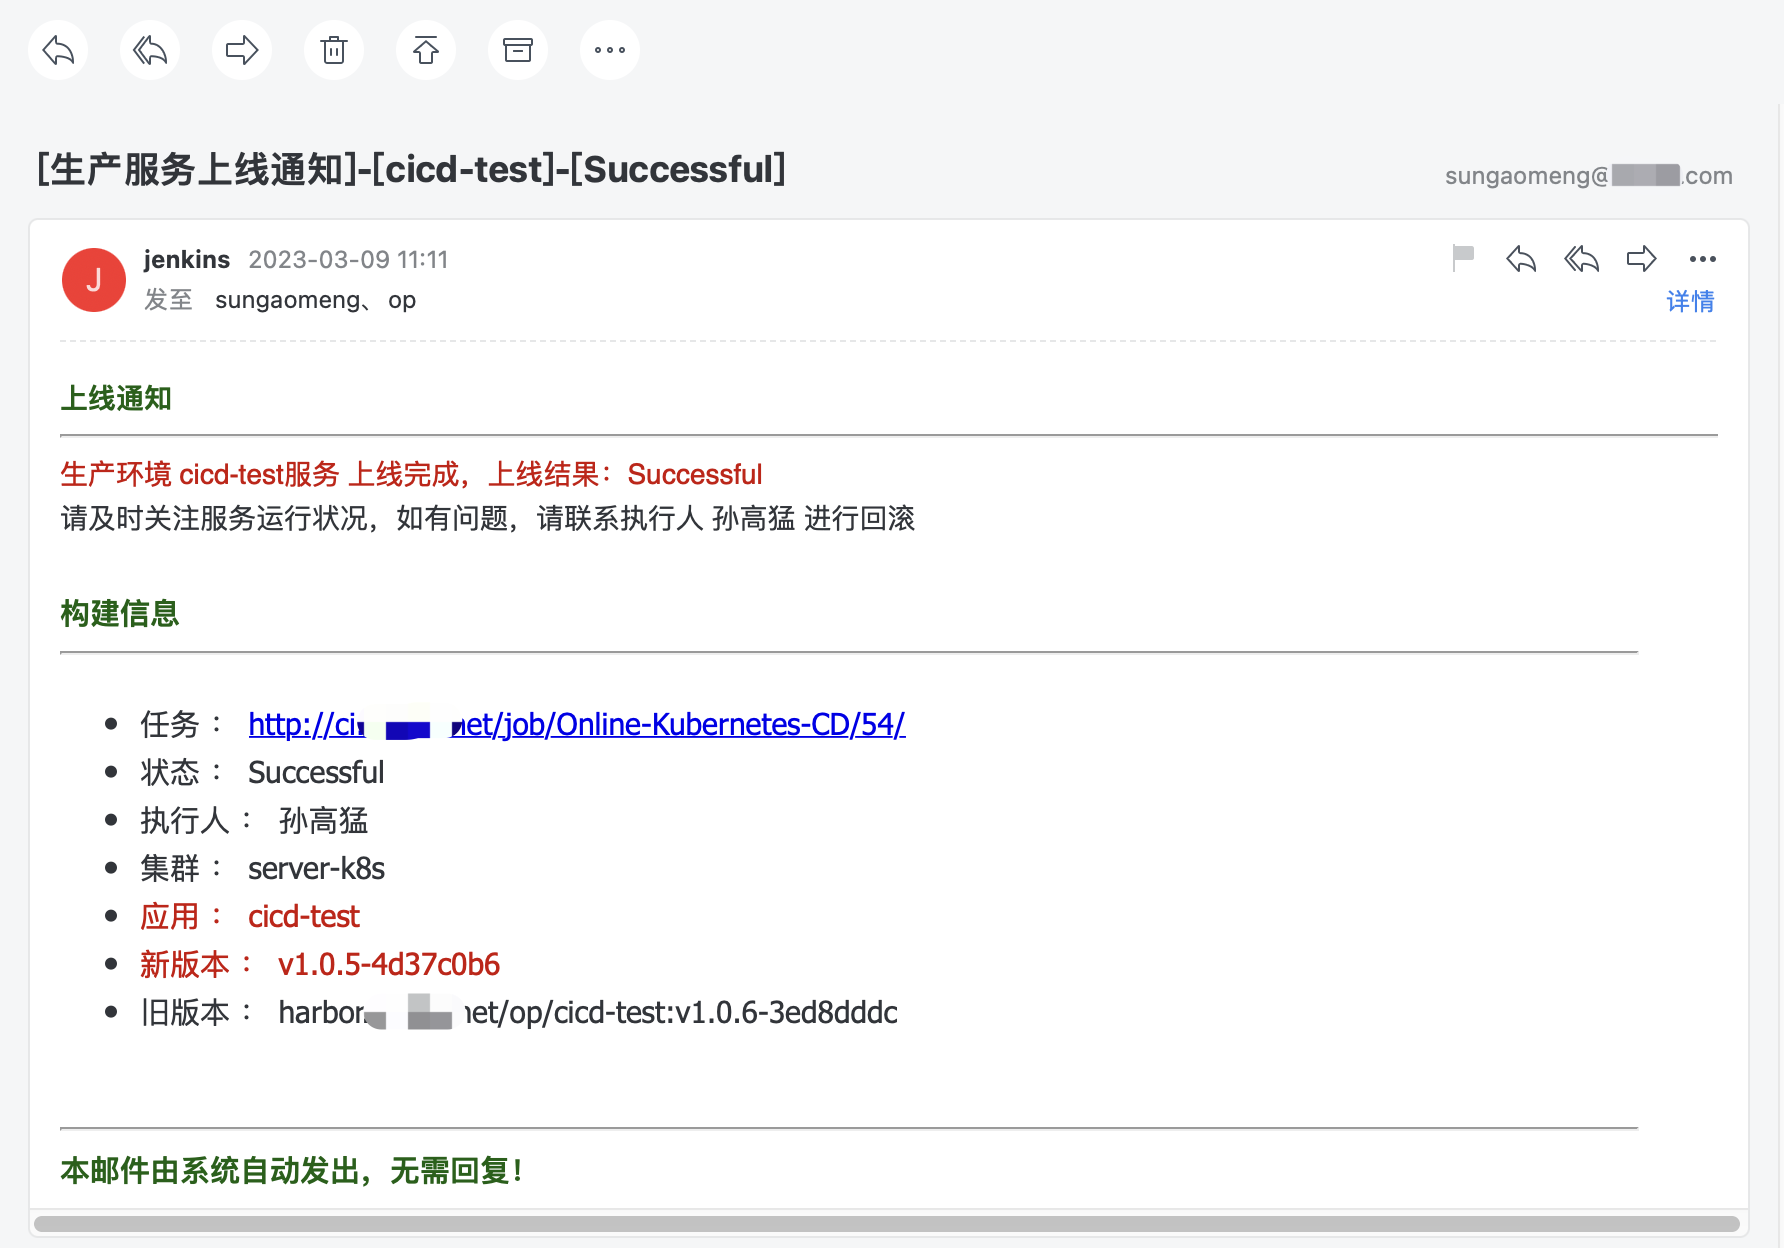
在Default Content处填写以下内容
|
邮件效果
Groovy脚本调试
Groovy Script脚本可以在 Jenkins ->系统管理->脚本命令行工具中进行调试